I’ve been tempted to do some technique write ups for some time, however, given the variety of teaching – good and bad. As well as the myriad variations of O soto gari I shied away for fear of creating too much controversy. However, I’ve decided to bite the bullet and just bust one out and see what happens.
I have split this into 5 sections; Basic, Intermediate, Against Kenka Yotsu, Combinations and Advanced.
If you're from a non Judo background or are hazy on the Japanese terms see here for a glossary provided by Ben Reinhardt
So without further ado, once unto the breach.
Basic
There is a secret to O soto gari that is so basic and so simple, yet is over looked or simply not known about by so many coaches. It is a secret that being unaware of it can be traced as one of the root cause of so many problems with O soto gari. What is that secret?
It’s shockingly simple.
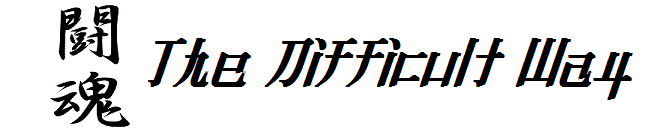
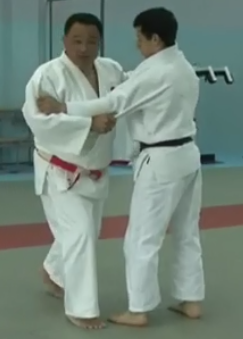
When starting O soto gari many people start standing straight on to uke and then step out to place their foot correctly

The effect of this is that it starts the entire throw direction going off in the wrong direction. Going diagonally away from uke, it twists tori’s hips away from uke’s and as a result wrecks tori’s ability to properly apply kuzushi with the tsurite.

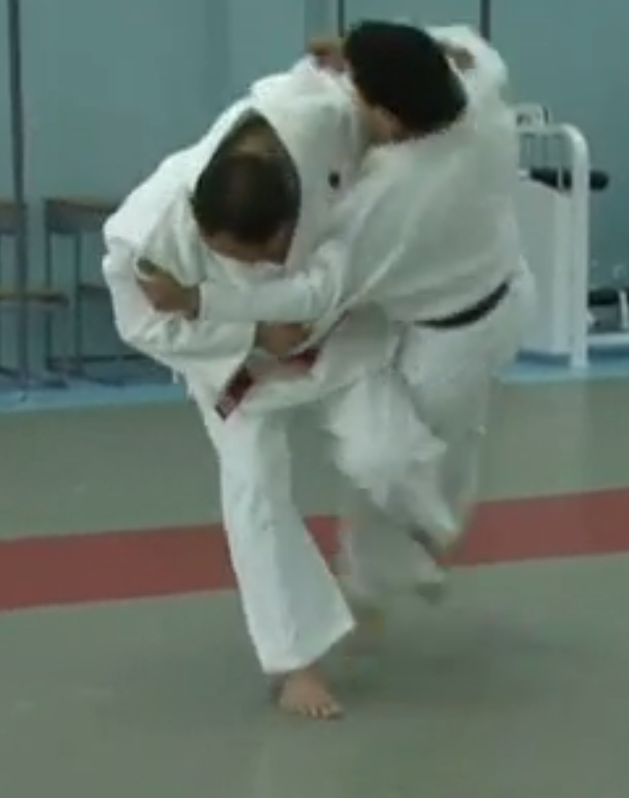
The mind boggling simple fix and correct positioning is to slightly off set yourself from uke so that you entry step is an almost straight one

The reason behind this is simple and for those of you who have trouble with stiff arming. Try this little test in uchikomi.
Stand straight onto to you partner and have them stiff arm you whilst you try to enter.

Trying to push directly against uke’s strongest points will allow all your power to be dissipated.
However, if you place yourself slightly off centre with uke their ability to resist your entry effectively collapses.

Once you have correctly positioned yourself for O soto gari then you can start to learn the other key elements.
Tsukuri
Unusually for a Judo throw I’m going to start with tsukuri, then cover kuzushi, then kake. In fact in reality all throws should be taught this way, but in O soto gari it is particularly important.
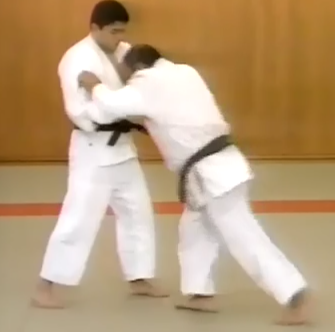
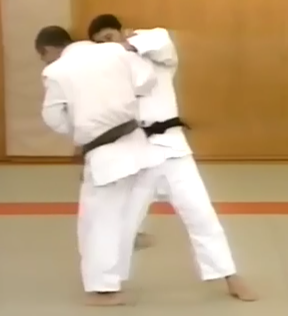
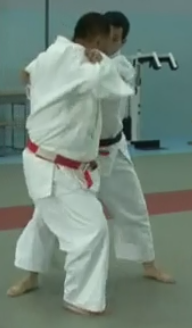
Often people will enter for O soto gari shoulders first.Whereas you should enter with the hips first, however, this doesn’t mean to come in as if you’re being lassoed around the waist.

If you were ever taught how to throw the Javelin in school, think about that, that's the best analogy I've come across.

It’s important to think in terms of placing your upper body next to uke’s body as if you were moving your entire body as one whole rather than stepping and then allowing the rest to follow. Envision it as one motion.
At this point it is probably worth mentioning foot placement. I know a lot of people have very entrenched opinions about foot placement. The reality is that in a randori or a shiai it will vary vastly on you, your opponent, ai yotsu, kenka yotsu and a variety of other factors. However, for the basic canonical form you should step level with uke’s foot leaving enough space between you and uke for your hips to fit into. This means exact distances etc... will vary from person to person and vary based on your uke.
Kuzushi
In Judo there are always many ways of achieving kuzushi, some of which aren’t to do with a hand action at all. However, for a beginner it is important to learn the canonical version of kuzushi in order to fully grasp the principle and the basics of the technique. This serves as a foundation for future adaptation and personalisation.
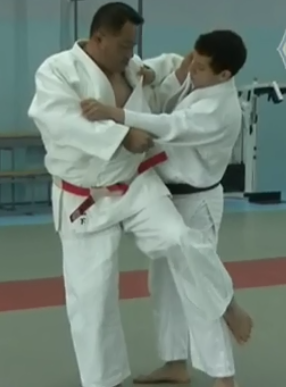
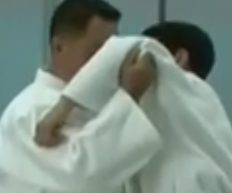
For O soto gari the tsurite – lapel hand – is the most vital. Your forearm must make firm and sustained contact with uke’s chest. It is important that you attack the chest.
Like so

Applying kuzushi like this will push your partners upper body away from you causing a loss of control and failure to achieve shimekomi

The incorrect hand action.
If your tsurite is driving straight into uke's chest or in the direction of the thrown over leg, you're probably ok

If your tsurite is driving straight into uke's chest or in the direction of the thrown over leg, you're probably ok

The tsurite should, as well as, having chest contact with uke act in an upwards motion, towards uke’s chin. This is so as to gain control over the head which facilitates control and off balancing of the whole upper body.

This action should be simultaneous to the action of the hikite – sleeve hand – both hands must work together and in concert.
The hikite action is that of a pulling across toris’ chest then down to tori’s far hip, if uke is of a similar or greater height.

The hikite action against someone smaller is that of pulling outwards, away from uke’s body, and upwards.

Note how Yamashita has positioned his body and hips relative to that of uke.
Kake
Perhaps the most critical factor for effective kake asides from effective kuzushi and tsukuri is the leg action.
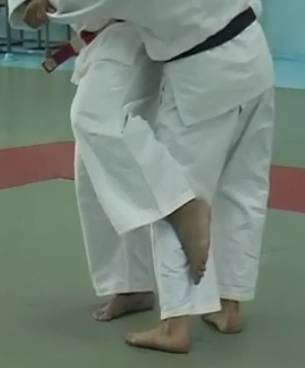
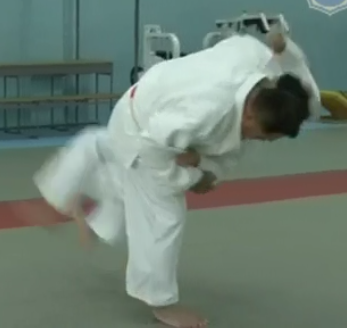
The toes must be pointed to achieve maximum reaping power and the correct leg action;

The reaping leg should be brought as high as possible, the greater the height, without compromising stability the greater the power of the throw.
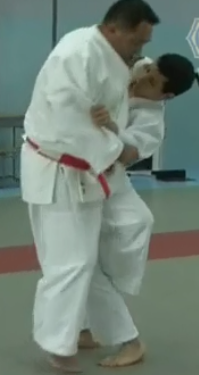
The reaping action should be performed in a full 180 degree arc so that the foot rises to this point
And then reaps uke’s leg with a smooth powerful action, to finish at this point.

The direction of the head movement should be level.

Up until the moment of the reap where it should be directed straight down
It's important to note here why you want to, counterintuitively, be upright on entry. Get out of your chair and stand up, now standing upright with your eyes looking straight ahead see how high you can lift your leg up to the Osoto reap position in the first of the above photos.
Now, go back to your normal stance, instead of being upright put your head down and lean your shoulders forward. Now see how high you can lift your leg to reap. Assuming you are a human being you won't be able to lift your leg even half as high. If you've been struggling to generate power, during uchikomi, in your reap, work on being upright on entry and getting the leg high and see if you get an improvement.
This should have covered all the pertinent points for learning the absolute basic O soto gari.
Intermediate
The intermediate period of learning O soto gari marks the transition from acquiring and familiarising yourself with the basic movements outlined above.
Here some of the finer points of O soto gari are addressed.
First is that of the action of the planted foot. On planting the foot it is important to dig the toes into the mat in a clawing action. By exaggerating this action you will ensure that you step on the ball of your foot rather than flat footed.


This aids in facilitating power transfer from the hips, forward into the reaping leg so that it can be applied to uke.
One of the main key intermediate skills of moving from the basic static uchikomi for O soto gari is being able to do O soto gari properly on the move.
As I emphasised strongly earlier, it is critical to off centre yourself relative to your uke to perform O soto gari. However, doing this on the move can be tricky.
If you’re unfamiliar with doing O soto gari uchikomi or nagekomi on the move. Then I recommend you follow this progression sequence.
Once you’re confident and capable from that progression sequence then you have built up the coordination to move onto the more complex methods.
There are two main methods, that I have seen, both rely on the chasse step.
The best way to illustrate these two methods is through video.
Apologies for the soundtrack I forgot to remove the original soundtrack when making it slow mo. Its either this or 50% speed Russian techno.
However, you should be able to see from the video that tori advances and steps slight off centre with his right as uke retreats with his left, then tori performs a tsugi ashi step and brings his left foot to his right and then accelerates forward to perform tsukuri.
This stepping pattern is highly effective in moving uchikomi and nagekomi and allows you to fit in many repetitions with the correct off centring and leading with the hips.
Note the high leg action in preparation for the reap.
An alternative action is the one favoured by Yamashita
In this action Yamashita advances for a few paces, then retreats then advances again.
At this point he twists in his tsurite side hip.

Then using that action combined with his advance, performs a tsugi ashi action bringing his tsurite foot to his hikite foot.

And then accelerates into the technique

Again this audio track or half speed Russian techno.
These are of course drills based around a cooperative uke designed to instil the core movement skills.
Often, however, you will encounter situations for which these core drills are not specifically designed for, the challenge of kenka yotsu – opposing grips.
Kenka Yotsu
In Judo there are two types of grips.
Same side grips – Ai yostu, right on right, left on left
And opposite side grips – Kenka yotsu – right on left.
For the O soto gari specialist the kenka yotsu situation can present some unique challenges.
The Kenka yotsu situations usually sees uke and tori positioned as such, tori indicated in red and uke in blue.

There are two main methods of resolving this situation.
Firstly through ayumi ashi.
Tori and uke stand in the Kenka yotsu situation

Tori advances with his right foot,
He then advances with his left in time with uke’s reaction.
He is then in a perfect position to execute O soto gari
Note how in this instance tori does not attack uke straight on, but because this is a kenka yotsu situation he has had to adapt how he positions himself off centre in relation to uke.
The alternative and more often seen version in randori and competition is that of the Ken ken O soto gari.
Beginning in Kenka yotsu.
NOTE TORI IS A LEFT HANDER REVERSE ALL ACTIONS
Tori raises his leg to attack with O soto gari.

However, due to the kenka yotsu situation the throw can’t be completed in the usual manner. So tori clamps his foot to uke’s knee joint.
Note how tori applies kuzushi with his hands to weight the heel of the leg he is intends to reap. Whilst simultaneously applying pressure to the knee and thus preventing the movement of the leg he intends to reap.
At this point it is important tori points his toes to achieve maximum power
Tori then performs small hops to bring himself round, so that he is suitably off centred with uke and in perfect position for O soto gari.
He performs the reap
The video
O soto gari Combinations
O soto gari to Sasae tsurikomi ashi
O soto gari to Sasae tsurikomi is a classic combination for two reasons, because it utilises the action-reaction sequence which is at the heart of all good Judo and because both throw require tori to be slightly off set from uke.
Here Katanishi demonstrates how the action reaction sequence for O soto gari to Sasae tsurikomi ashi works. It’s such a good demonstration that I don’t think it needs breaking down. I have left it with the original French soundtrack for the benefit of those reading from France.
However suffice to say that Katanishi demonstrates that tori’s attacking action elicits a defensive forward reaction from uke which can then be exploited to throw them with Sasae tsurikomi ashi.
Katanishi shows the principle well, however, its important to remember that the ability to attack meaningfully with an O soto gari and have the awareness of debana to sense uke’s reactions, react to it, take control of uke and throw him with Sasae tsurikomi ashi in randori or shiai is a very advanced skill.
And here Yamashita shows some of the finer points of the application of the two techniques.
Worthy of particular note is how Yamashita controls uke’s hikite elbow, bending it up and round to generate kuzushi
O soto gari to O uchi gari
O soto gari to O uchi gari is another classic combination.
When advancing to attack with O soto gari
As you attempt to reap the leg, due to imperfect debana, kuzushi and shimekomi, uke is able to step back with their leg, foiling the technique.
However, this leaves you perfectly T-ed up with uke.
As Yamashita demonstrates with his hands

Seen from another angle it becomes clear
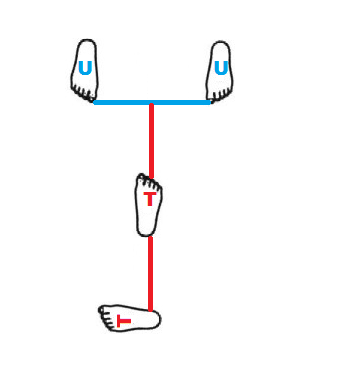
From here it is simple to apply O uchi gari
Of course it should remembered that this is a training drill and so the actions and reactions are somewhat contrived, however, it teaches the principle of action reaction to combine the two throws.
Advanced
When I know, I will tell you.
http://www.youtube.com/watch?v=ikoQfJ1nLbY&feature=related
ReplyDeletehere's a really good video about o uchi gari, explained by koga!
Great post, I love O soto gari and you explained it very well, thank you very much!
ReplyDeleteBest series I've ever seen on O-Soto Gari...bar none!
ReplyDelete-Ray Litvak
Judo Instructor @ http://budokaijudoclub.ca/